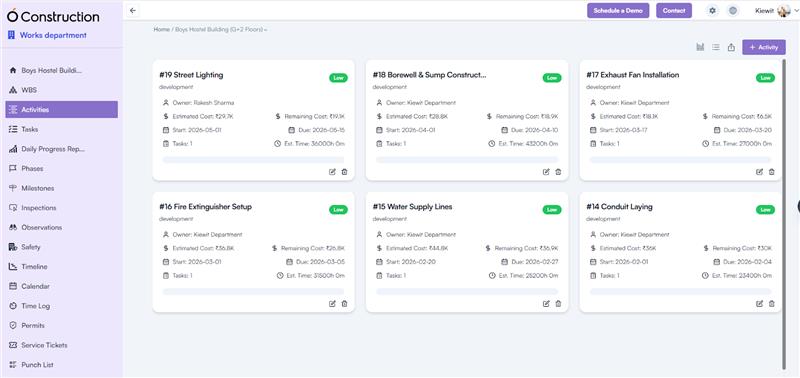
- Activities represent the next level of work division under a WBS (Work Breakdown Structure).
- Each WBS can contain multiple activities that define specific work packages or operational steps.
- These activities help in detailed planning, execution, tracking, and cost management within a project.
Steps to Create an Activity
1. Navigation Path:
Log in to the application → Go to Project Overview Page → Left Menu → Click Activities
2. Create Activities:
Click on the Create Activities button to open the creation pop-up.
Create Activities – Popup Fields
Basic Information
- Title*: Enter the name of the activity.
- WBS*: Select the WBS from the dropdown list.
- Upon selection, the Estimated Cost and Remaining Allocated Cost for that WBS are displayed.
- Owner*: Select the user responsible for executing the activity.
- Type: Choose the type or category of work (e.g., Civil, Electrical, Plumbing, etc.).
- Priority: Assign a priority level (Low, Medium, High, etc.).
- Start Date / End Date: Select the duration of the activity.
- Dates must fall within the WBS Start and End Dates.
Dependency Configuration
- Select Activity: Choose an existing activity to establish a dependency.
- Link Type: Define the relationship as Predecessor or Successor.
- Dependency Type: Choose one of the following:
- Finish to Finish (FF)
- Finish to Start (FS)
- Start to Finish (SF)
- Start to Start (SS)
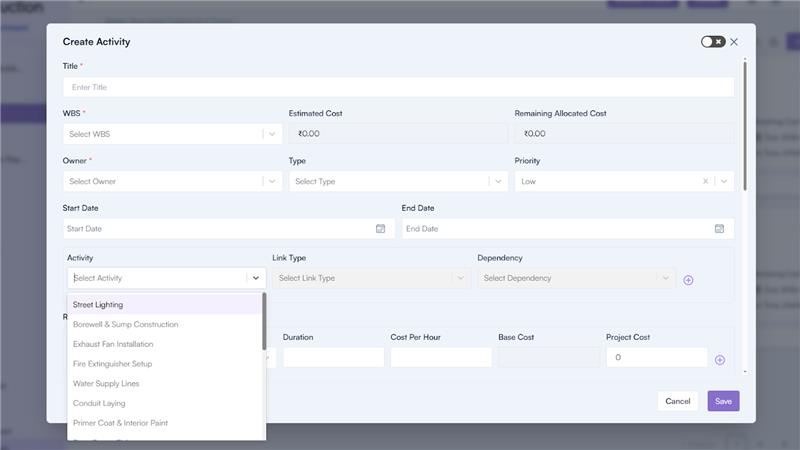
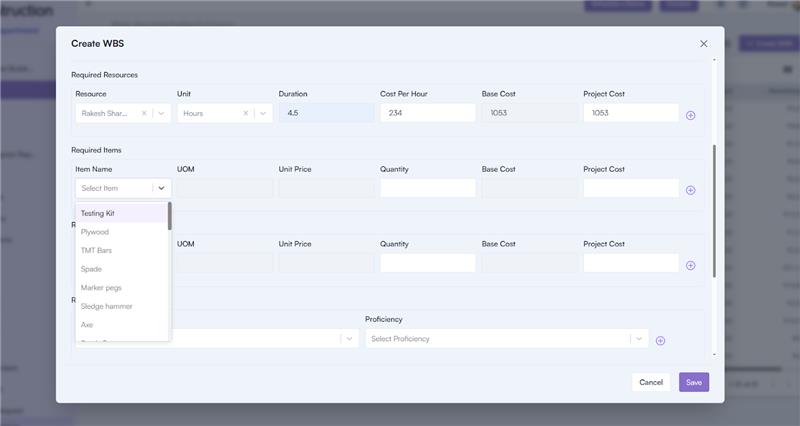
Resource Allocation
Allocate human resources required for the activity:
- Resource Name: Select from the dropdown list.
- Unit: Choose Hour, Day, Week, or Month.
- Duration: Enter total working duration.
- Cost Per Hour: Define the hourly rate.
- Base Cost and Project Cost are auto-calculated.
- Add multiple resources using the (+) icon.
Item Allocation
Add material items required for the activity:
- Item Name: Select from the dropdown (fetched from Company Settings → Item Master).
- UOM & Unit Price: Auto-filled on selection.
- Quantity: Enter the required quantity.
- Cost Calculation:
- Base Cost and Project Cost auto-calculate.
- Add multiple items using the (+) icon.
Asset Allocation
Include assets or equipment needed for execution:
- Asset Name: Select from the dropdown (Company Settings → Asset Master).
- UOM & Unit Price: Auto-filled.
- Quantity: Specify quantity.
- Cost Calculation:
- Base Cost and Project Cost are auto-calculated.
- Add multiple assets using the (+) icon.
Skill Requirement
- Skill Name: Choose from dropdown (Company Settings → Human Capital Section).
Defines the skill sets required to perform this activity efficiently.
Cost Summary
- The Total Estimated Cost is automatically calculated based on total resources, items, and assets linked to the activity.
Inspection Configuration
If the activity requires inspection, select the checkbox “Do you want to add inspection to this activity?”
- Inspection Type: Choose Pre, During, and/or Post (multiple selections allowed).
- Role & Approvers: Automatically displays approvers responsible for inspection from Company Settings → Construction → Inspection Approver Sequences.
Additional Information
- Description: Add relevant details or work instructions for the activity.
- Attachments: Upload any supporting documents or drawings.
Click Save to create and record the activity.
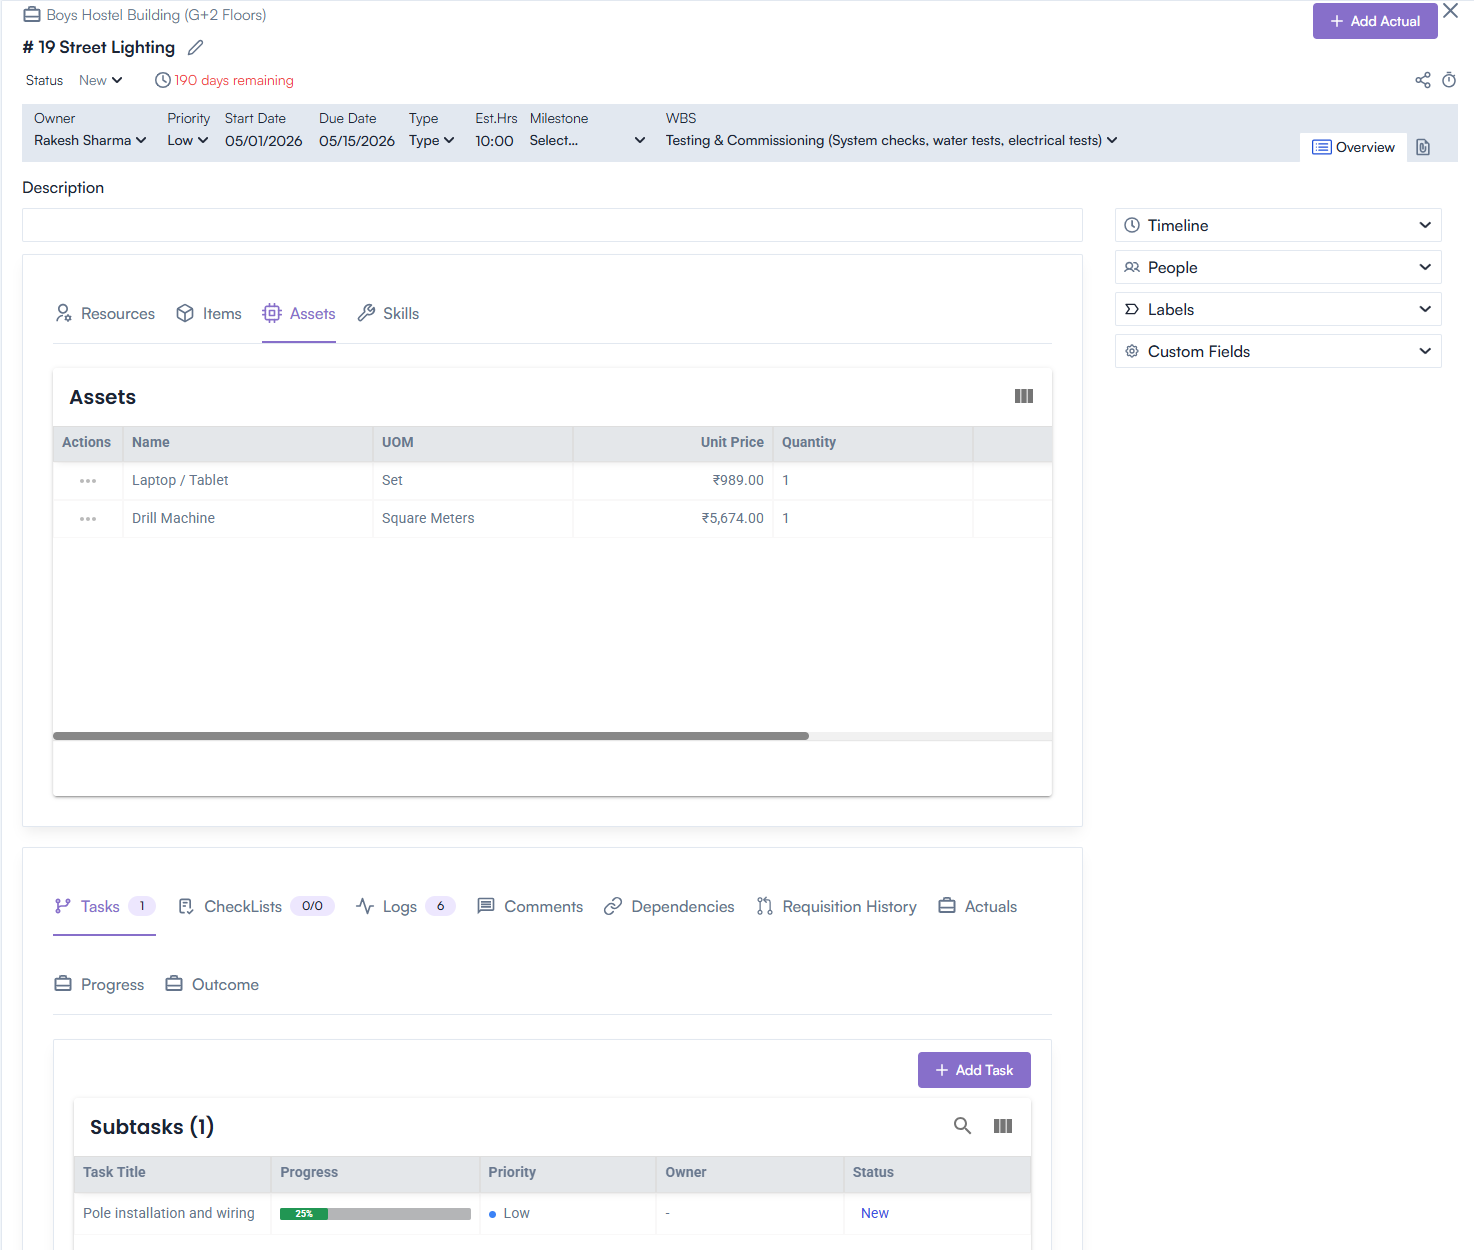
Activity Details Page
After creation, all details appear on the Activity Details Page such as:
- Resources – Displays all assigned resources, their hours, and cost details.
- Items – Lists all materials with quantity, cost, and UOM.
- Assets – Shows assigned equipment with utilization data.
- Skills – Displays required skills and associated roles.
- Est. Hours – Planned working hours for completion.
- Spent Hours – Actual hours logged.
- Start Date / Due Date – Actual and planned timelines.
- People, Labels, Custom Fields – For tagging, categorization, and additional metadata.
- File – Lists uploaded attachments for quick access.
Additional Features
- Generate Link – Creates a shareable link for quick reference.
- Time Log – Allows manual entry of work logs with fields for Task Title, Owner, Date, Start Time, End Time, Break Time, and Comments.
- Save / Cancel – Save entries or cancel edits.
Actions Available
- View – Open the detailed Activity page.
- Edit – Modify existing details.
- Delete – Remove the activity record.
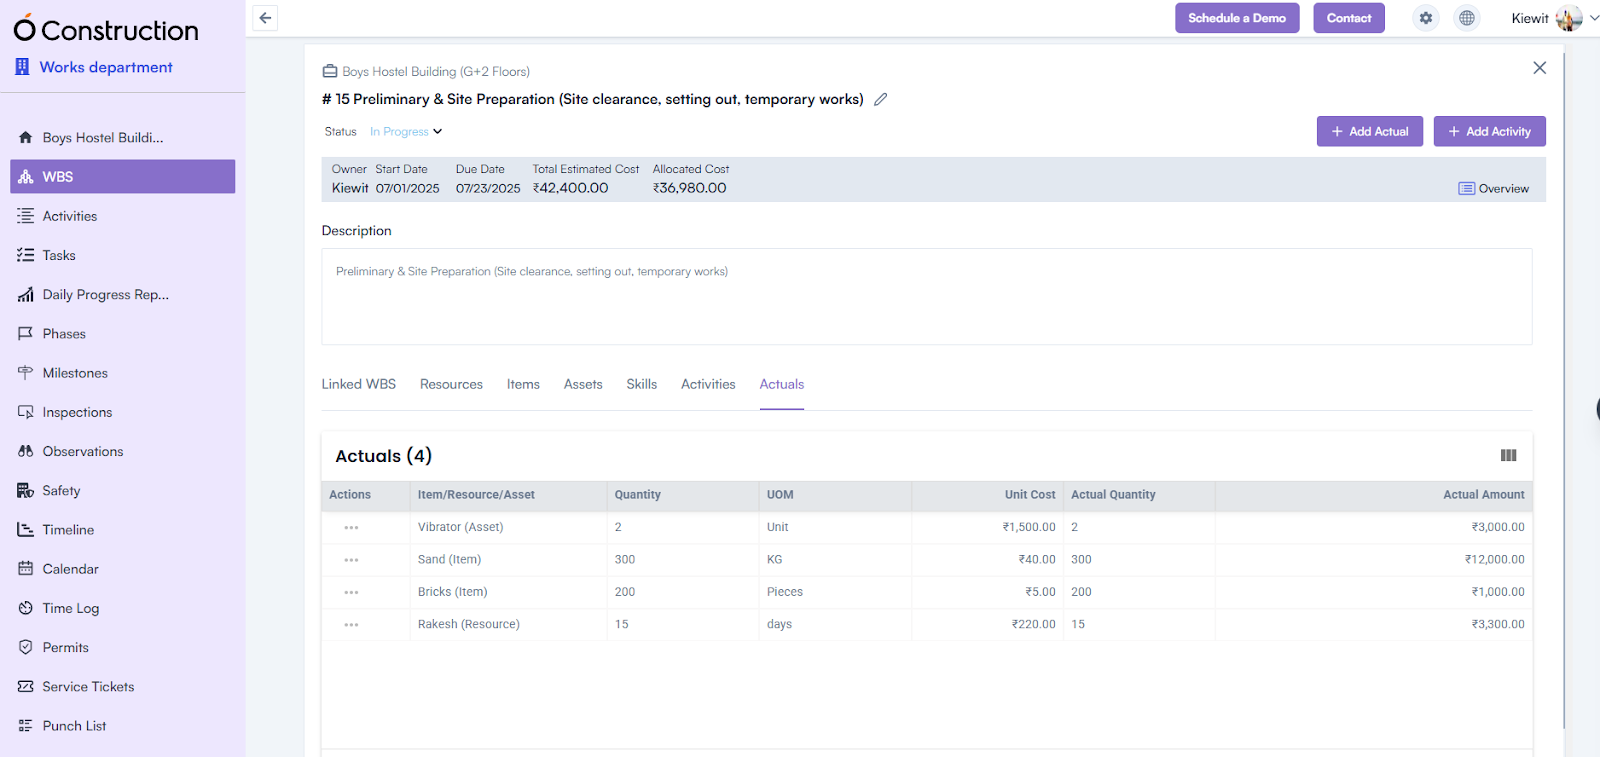
Activities Actuals
- On the Activities Details Page, click Add Actuals from the header.
- Allows users to enter actual data related to cost, progress, and resource utilization.
- All actuals dynamically update in the activity summary.
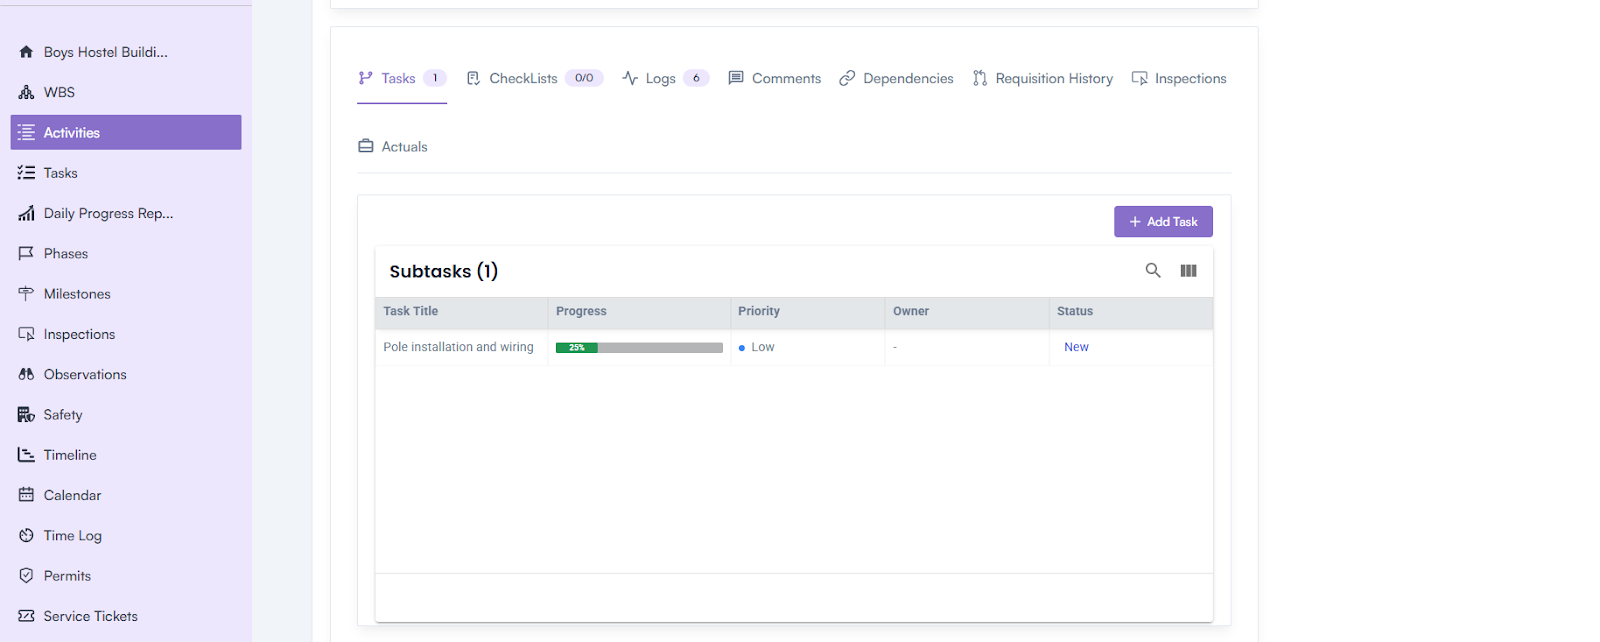
Linked Details Displayed in Activities Details Page
The Activities Details Page includes several linked components for better traceability and progress tracking:
- Tasks – Lists all tasks created under the activity, including their status and assignees.
- Checklists – Displays predefined inspection or quality checklists linked to the activity.
- Logs – Maintains chronological records of all activity-related updates, time logs, or progress notes.
- Comments – Shows user discussions or feedback related to the activity for collaboration.
- Dependencies – Outlines relationships between this and other activities for better sequencing.
- Requisition History – Tracks all material or asset requisitions raised for the activity.
- Inspections – Displays inspection types (Pre, During, Post) and their status updates.
- Actuals – Shows real-time actual cost, effort, and duration data compared to estimates.